How to record a Webex meeting


In this article
To record a Webex meeting, join as the host, select Record in the meeting controls, choose a recording destination if prompted, and start recording. If the control is missing, check your meeting role and your organization's recording settings; a separate audio recording does not replace a Webex recording of shared screens and video.
- How to record a Webex meeting: use the host's Record control, then confirm that recording actually starts.
- Webex cloud recording suits centralized playback and sharing; computer recording suits keeping a local file.
- Omi suits professionals who want spoken meeting notes and tasks, rather than a recording of shared screens.
- Get recording permission, test the audio, and check the saved result before relying on it.
Why this matters
A recording button is not a recording strategy. You need to know whether you're saving the presentation, the conversation, or both—and who needs access afterward.
For a 2026 meeting workflow, settle permission and storage before the call starts. Consent rules vary by location; check local law and your organization's policy. This guide to recording consent covers questions to consider before capturing conversations.
Use Webex recording when you need the meeting itself. Use an audio-note workflow when you need the spoken decisions and follow-ups. Neither choice removes your responsibility to tell participants what you're recording.
How to record a Webex meeting
Start with the Webex meeting controls, not your operating system's screen recorder. Webex's own recording controls give you the clearest route to a meeting recording when your account and meeting permissions allow it.
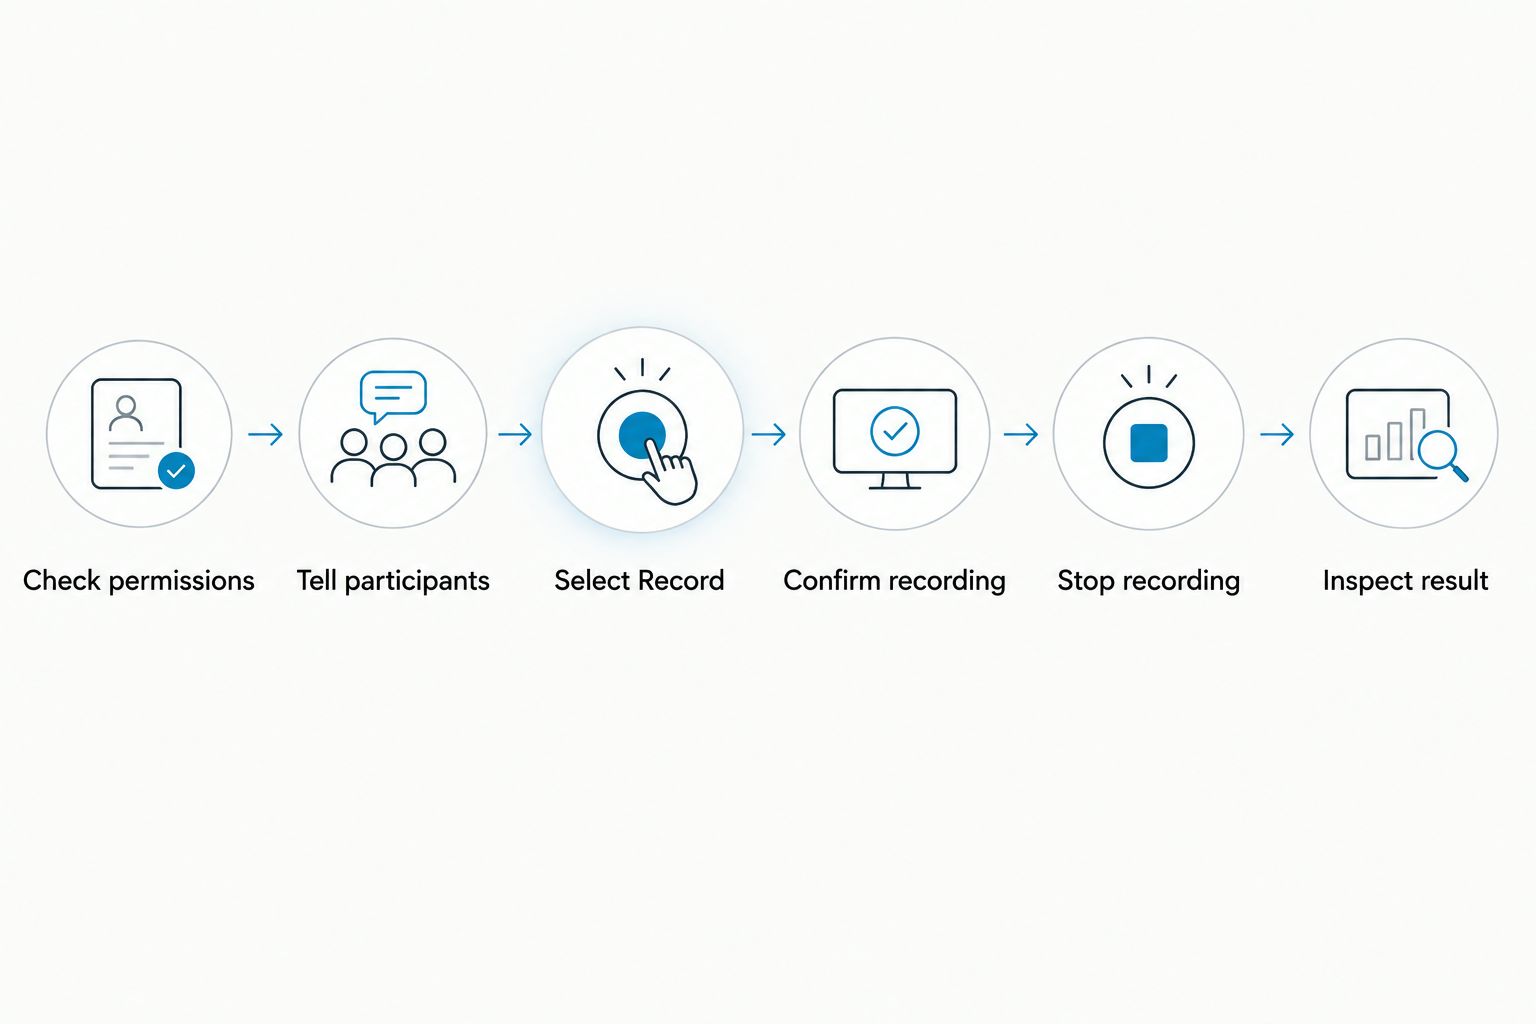
1. Join as the host and check permissions
Open the meeting and confirm that you are its host. Being invited to a meeting, presenting slides, or sharing your screen does not automatically give you recording permission.
If you're a participant, ask the host to record. A cohost's recording options depend on the meeting configuration, so check the available controls rather than assuming the role guarantees access.
2. Tell participants what you're saving
Explain whether you're recording the meeting's audio, video, and shared content, or only capturing spoken notes. State who will receive the result and follow your organization's consent process before starting.
Do not treat a recording notification as a substitute for checking applicable consent requirements. For sensitive discussions, confirm that the recording method and storage destination are approved.
3. Select Record
Find Record in the meeting controls. If the toolbar is condensed, check its additional-options menu.
When Webex presents a destination choice, select the cloud or your computer according to your account's available options. If you don't see that choice, use the recording option your account supports rather than looking for a setting that isn't available to you.
4. Start and confirm recording
Start the recording and check for Webex's recording indicator. Do not assume that opening the recording panel means capture has begun.
Before the main discussion, confirm that participants can hear one another and that the intended content is being shared. A recording cannot recover speech that never reached the meeting.
5. Pause or stop deliberately
Use the recording controls to pause or stop capture when appropriate. Pause before an off-record discussion begins, not after someone has already shared sensitive information.
Tell participants when recording resumes. Keep the boundary between recorded and unrecorded discussion clear.
6. Find and inspect the result
For a cloud recording, check the recordings area of your Webex account after processing finishes. For a computer recording, check the save location selected during setup.
Play the result before distributing it. Confirm that the voices, presentation, and relevant discussion are present, then share it through an approved channel.
Which Webex recording method should you use in 2026?
Choose the method by the result you need, not by whichever button is easiest to find. A meeting recording and a set of spoken notes solve different problems.
| Method | Best for | Main advantage | Main limitation |
|---|---|---|---|
| Webex cloud recording | Hosts who need centralized playback and sharing | Keeps the recording accessible through the Webex account | Depends on account permissions, organizational settings, and processing |
| Webex computer recording | Hosts who need a local recording file | Saves the result to a selected computer location | You must manage storage, access, and distribution yourself |
| Omi audio capture | Professionals who need transcripts, summaries, and tasks | Organizes spoken interactions without joining as a meeting bot | Room audio capture needs audible speakers and does not capture shared screens |
For a presentation review, choose Webex recording. For a conversation you need to search and turn into follow-ups, audio notes address that narrower need.
Avoid running multiple recording methods without a reason. Each additional copy creates another file or account whose access and retention you must manage.
Webex cloud recording: best for shared playback
Cloud recording suits a host who wants colleagues to review the meeting afterward without distributing a local file. Start it from the meeting controls when your Webex account offers cloud recording.
Its advantage is centralized access. Its limitation is dependency on the account's recording permissions and the organization's settings, including how recordings are shared and retained.
After the meeting, wait until processing completes before promising access. Open the recording yourself, check playback, and inspect sharing permissions before sending it to attendees.
For your 2026 recording process, decide who owns the recording when the host is absent or changes roles. A useful recording is still a problem if the people who need it cannot access it.
Webex computer recording: best for a local file
Computer recording suits a host who needs direct control over the saved file. Use the Webex desktop app and select computer recording when that option is available.
The advantage is a local file you can organize within your approved storage workflow. The drawback is that you—not a shared playback page—must handle distribution and control additional copies.
Choose an identifiable save location before recording. Afterward, open the file from that location and check it before moving or uploading it elsewhere.
Do not assume a browser session offers the same recording choices as the desktop app. If computer recording is missing, check the desktop app, your meeting role, and your organization's settings before changing tools.
Audio notes: best for decisions and follow-ups
Omi is best for professionals who need spoken meeting notes and tasks, not a video replay. It produces transcripts, summaries, action items, and searchable memories from captured conversations.
For a Webex conversation, an audio-only approach is to play the meeting through speakers and capture the room audio with the phone app or wearable. The app works without the wearable using the phone's built-in microphone; it does not join the meeting as a bot.
The trade-off is physical: headphones keep the other participants' voices out of the room. A microphone beside your laptop cannot capture remote speech clearly if that speech is only playing inside your headset.
Omi supports 33 languages, with English the most accurate, and requires you to set the language manually. It does not automatically switch languages mid-conversation, so check the setting before a multilingual call.
For capture planning in 2026, Basic includes 300 listening minutes per month. Reaching the minute cap does not stop recording; audio remains available to manage and export. Review the captured transcript before treating names, commitments, or deadlines as final.
Why Webex recording options vary
There isn't one recording menu that every attendee sees. These factors determine what you can do:
- Meeting role: The host has recording responsibilities; an attendee does not automatically inherit recording access.
- Account permissions: Your account determines which recording features are available.
- Organization policy: Administrators control recording access and related settings.
- App or browser: Desktop and browser meeting experiences do not always expose the same controls.
- Recording destination: Cloud and computer recording create different storage and sharing responsibilities.
- Audio setup: Headphones, speakers, and microphone selection affect what a separate audio recorder hears.
Check these factors in order when troubleshooting. Switching recording apps does not fix a permissions issue, and changing your meeting role does not fix an inaudible speaker.
Why can't I see Record in Webex?
A missing Record control calls for a role and settings check first. Confirm that you're the host, inspect the toolbar's additional options, and check which recording features your account supports.
If the option remains unavailable, ask your Webex administrator whether recording is enabled for your account. Give them the app you're using and whether you're trying to record to the cloud or your computer.
Do not spend the live meeting reinstalling software while the discussion continues. Ask an authorized host to record, or agree on an approved alternative before capturing anything separately.
Can I record a Webex meeting if I'm not the host?
An attendee should ask the host to start the Webex recording and share it afterward. Joining the meeting or sharing a presentation does not itself grant recording permission.
If a separate audio recorder is permitted, explain that you're creating another recording outside Webex. Get the required consent and organizational approval rather than treating external capture as a workaround for a recording restriction.
How do I check that a Webex recording is usable?
Play the saved recording and check both the opening and the parts containing important decisions. Listen for remote participants, your own voice, and anyone speaking from a shared meeting room.
For a presentation, confirm that the relevant shared content appears. For an audio-only record, make sure the spoken discussion explains the decision without depending on an unseen slide.
For recurring meetings in 2026, make this playback check part of the handoff. A file that exists but lacks the needed conversation is not a useful record.
FAQ
How do I record a Webex meeting on my laptop?
Join as the host, open the meeting controls, and select Record. Choose cloud or computer recording if Webex offers that choice, then confirm that recording starts.
Can I record a Webex meeting as a participant?
Being a participant does not automatically give you Webex recording permission. Ask the host to record and share the result, and get approval before using a separate recorder.
Where does a Webex recording go?
A cloud recording appears in the recordings area of the relevant Webex account after processing. A computer recording goes to the save location selected for the local file.
Why is the Record button missing in Webex?
The Record button depends on your meeting role, account permissions, organizational settings, and meeting app. Check your role and additional toolbar options, then ask your administrator about recording access.
Can I record Webex audio while wearing headphones?
Webex's built-in recording does not depend on a room microphone hearing your headphones. A separate phone or wearable recording the room needs the remote participants' voices played through speakers.
Can Omi take notes from a Webex meeting?
Omi can capture a Webex conversation played through speakers using its phone app or wearable, then produce transcripts, summaries, and tasks. That audio capture does not record shared screens, and you still need appropriate permission.
Do I need permission to record a Webex meeting?
Consent rules vary by location, so check local law and your organization's policy before recording. Explain what you will capture and how the result will be used.
One last thing
A recording preserves what happened. A checked summary makes it usable. Before sharing the result, identify the decisions, action owners, and unresolved questions, then compare them with the captured discussion.
If a decision depends on a chart, preserve the presentation through an approved channel too. Spoken notes cannot reconstruct a visual detail nobody described aloud.